DIY World Map Décor | Ally
Hey!!! It’s self-introduction time sooo…I’m Ally and I’m not
really in my right mind right now because I’ve been thinking on how to start
this post and I’m going nuts. Well forget about the mental state of my brain,
today I’ve got a new DIY for you! It’s my 3rd DIY and hopefully
you’ve stumbled upon my previous DIY's before but if you haven’t….then go stumble
upon that later J
Ever wished you could travel around the world but never
found the time, place, expenses, companion or just simply too young to travel
alone? *Yea that sums up my life* This DIY was inspired by my desire to travel
but obviously I’m too young to so it doesn’t hurt to plan it all out! This DIY
is kinda like a mini series so stay tuned for more DIY’s on travelling and such
^_^
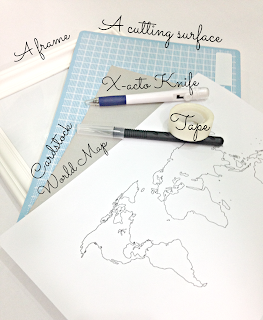
Today we’re gonna be doing a DIY which involve materials
which you can pretty much find lying around your house: -
-
a print out of the world map (Ok…maybe you can’t
find a picture of the world map lying around the house but you can print it out)
-
a frame
-
an old cereal box/cardstock (Whichever floats
your boat)
-
X-acto knife/scissors
-
tape & mod podge/glue
-
glitter/spray paint/paint (Optional if you would
like to ☆jazz☆ up the DIY)
First up, you’re gonna tape your print out on to the
cardstock (In my case, I’m using an old cereal box which I cut to size to fit
my image) Then using an X-acto knife, I carefully followed the lines and used
enough pressure to score the cardstock at the back of the image. If you have a
superrr sharp X-acto knife you could use that and save time on having to cut
out the image after with a normal pair of scissors. If you have the time and
patience, you could definitely focus on the tiny details as well.
Disclaimer: I did in fact miss out some islands, maybe small
countries and oceans when I was scoring the image on the cardstock. In my
defense, I’m bad with sharp objects and also they were too tiny for me to even
attempt to cut it out. If I did, it would be the size of an ant and I would
probably lose it sooner or later. I’m betting definitely sooner. Sorry~~~ L
After scoring the image onto the card stock, I cut it out and
I was left with weird-looking shapes but trust me it’ll turn out better than it
looks. I arranged it while following the original image. (It helps not to throw
out the ‘stencil’ because it’s easier for you to piece everything together)
After getting a rough image of what its suppose to look like, take a picture
for reference. I’m giving you guys tips just so you don’t end up like me and
how my room looked after = not good…..
Now is the time for you to beautify the pieces of the world
map or whatever you want to call it. I opted for spray-painting the pieces a
baby pink because I can sometimes be a-girly-girl.
Next, I glued all the pieces of the world map onto another
piece of cardstock so I end up with one whole piece. (I hope that made
sense) Tip: Make sure the cardstock fits into your frame or you could just use
the picture in the frame as a backing/outline/stencil. Is it just me or do the family in the original picture in the frame look freaky or what…errrrr?
Before you put the backing back into the frame, to
personalize the DIY even more, I cut out a small heart and covered it with gold
glitter. Side note: I personally think gold makes everything 10x nicer. Just
spread a thin layer of mod podge and sprinkle on the glitter and dust off any
excess. Just so the glitter doesn’t turn my room into a ‘glitter wonderland,’ I
applied another layer of mod podge to seal everything in.
I then glued the heart onto the place I would like to visit
in the future. I think this DIY can be the motivator for you to achieve your
goals. So I suggest hanging up the frame some place where you’ll always see it
and be reminded never to give up before you reach your goals. If your Geography
is good…you’ll know where I glued the heart on. ^_-
Reach for the stars,
Ally ✰
Ally ✰


Comments
Post a Comment